Pages

Friday, November 15, 2013

Retrofit the Kit Tudor Dollhouse: Part 4 Gettin' Down To Bizness - Real Good Toys Country Tudor CC15

Yay!

The panels and trim from Manchester Woodworks http://manchesterdollhouseandwoodworks.com/, have arrived, and I've sanded, applied two different stain colors and polyed the whole lot!


1st stain coat: Minwax Provincial. 2nd stain coat: Dark Walnut. I always start with the lightest stain first.
 ___________________________


The Floors

I've decided try some staining experimentation on the wood floors since I'm planning to cover them anyway. I wanted a checkerboard on the diagonal pattern. Creating the checkerboard pattern is trickier than it looks!

The first time I tried it I didn't score lines. It didn't work very well but it still had a nice, subtle effect. That experiment is now the 2nd floor floor (am I saying that right?).

Here is the technique that worked best for a lovely, stained, checkerboard floor:

              Step 1  Scoring the lines.                                                 Step 2 Taping alternate lines of squares.

Step 1: Scoring the lines (I used painter's tape to evenly space my lines. The width of the tape is the width of a square). You'll have to figure out your first diagonal so you'll have squares or elongated diamonds. Don't draw lines, let the width of tape be your guide and start with a tape spanning each end of your first and only diagonal markings.

  1. Lay out the tape on your first diagonal on your prestained board.
  2. Lay the metal straightedge just a smidgen past the tape edge. Hold down tightly!
  3. Using the back edge of a butter knife, press to score a line between the straightedge and the tape. (I have taped off a border). Score a couple of times to insure a good indentation.
  4. Lift the tape and place it up against the "fresh" score line. Continue scoring until all the "warp" scores are made.
  5. Perform the same scoring technique for the "weft" lines. They will be 180° to your previous lines.
Step 2: Staining the squares (3 stains total for this (you could use 2 - the initial board prestained, the 1st set of squares' stain and the 2nd set of squares' stain). I used pine for the prestain, provincial for the 2nd stain and dark walnut for the 3rd.
  1. Every other line of squares, tape off between the scores. Do this for both the warp and weft of the lines of squares so that there is a crisscross of tape with little open squares in between.
  2. Stain this first set of squares with your second color. Blot the stain on, gently.
  3. Remove the tape.
  4. Tape over these stained lines of squares, both the warp and weft, betwen the lines' scores. Only our prestain background color should be seen (with a bit of bleed over of course!).
  5. Stain this second set of squares with your third color (or if you want the squares to be all the same color, the same stain as your first set). Blot gently.
  6. Remove the tape and voila! Let dry and polyurethane the whole board (you can use waterbased poly).

Step 2 con't. The first stained squares.                                                                 Step 3 Finished!                   
 ___________________________ 

Beginning To Assemble: The 1st and 2nd Floors

(finally!) 

I've read all the instructions and have decided to assemble only the 1st and 2nd floors to the sides at this point. The instructions are pretty clever for this part, they have you use other parts of the home to support and get correct heights and such. I'm leaving the back off for now as I want good access to the interior sides when I apply the wainscot paneling.
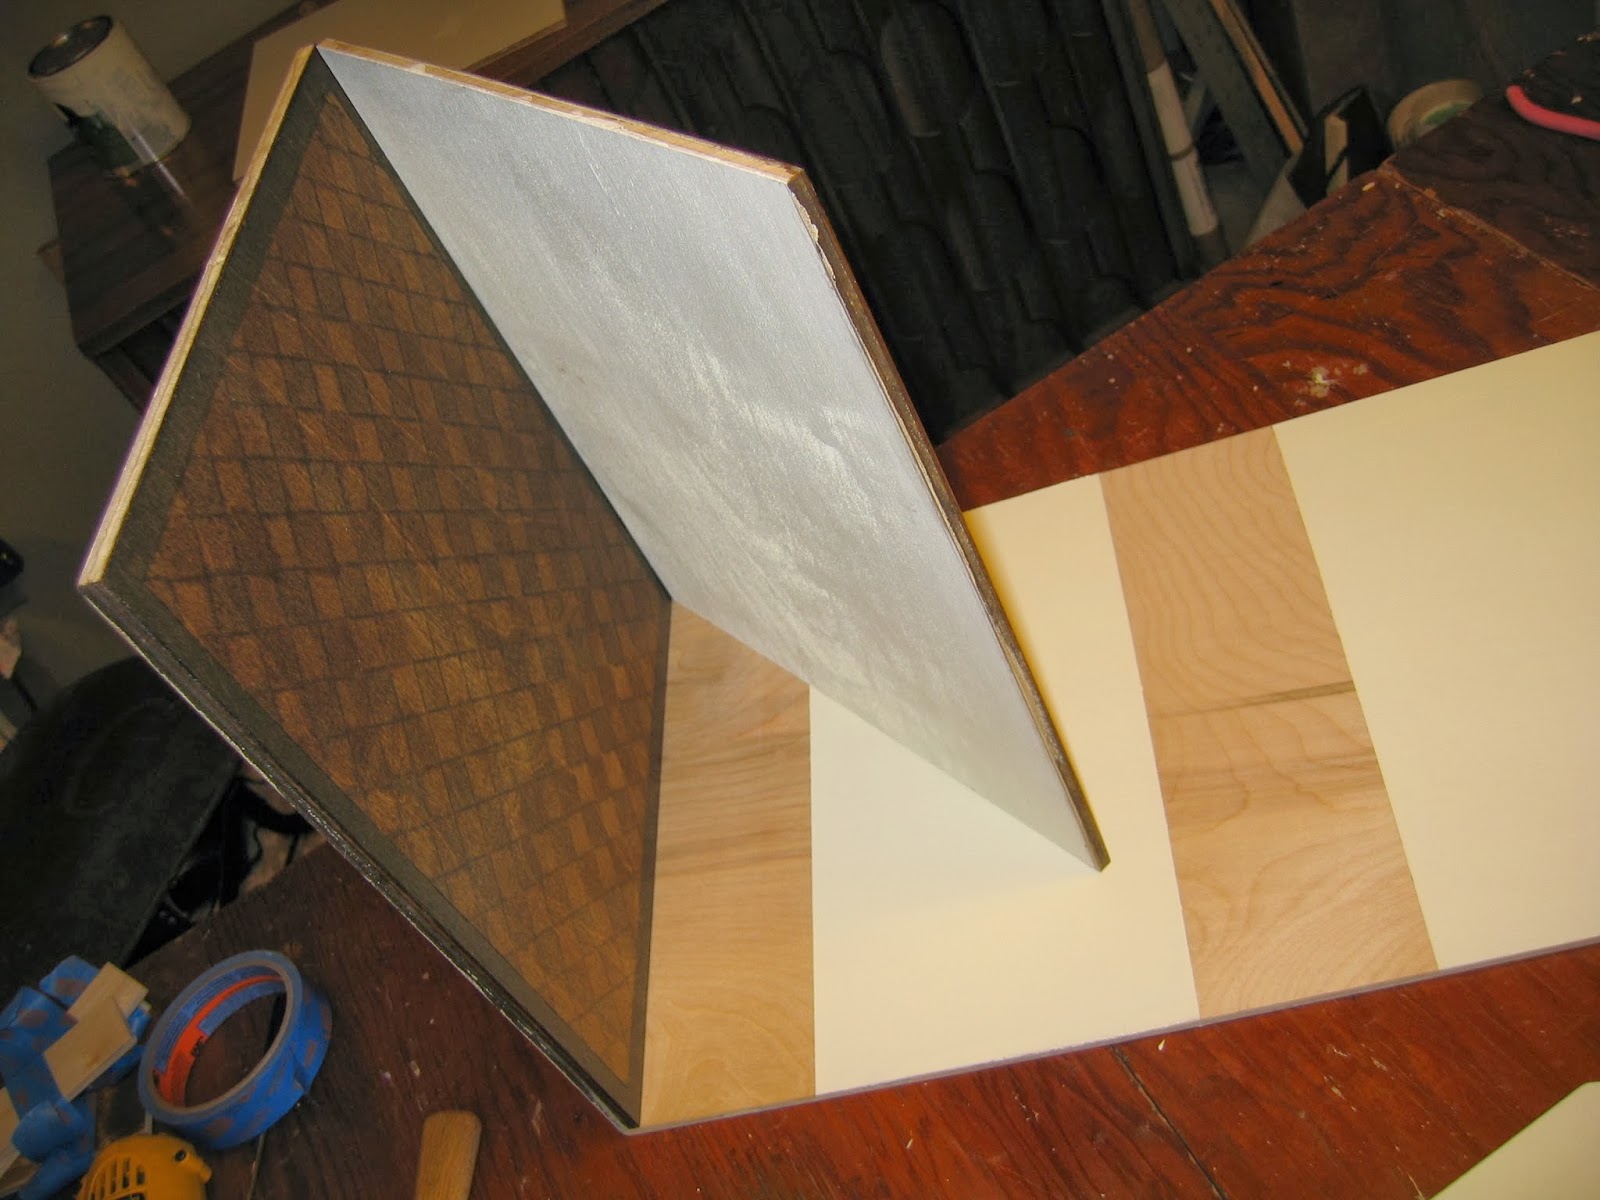
Here, one side of the house has been glued and nailed to the 1st floor and sits flat on the table. Another floor is propped up at an angle to support the opposite side's attachment to the 1st floor.


In this photo two of the hinge blocks are taped and used as spacers to get the 9" ceiling height for the 2nd floor. I'm using the square to make sure the floor is square to the side before I glue and nail the other side onto the two floors.


I don't think I'll be covering the floors. I really like them stained!
And goody(!) a look at the sides installed with the front propped up behind. The 2nd floor floor shows my first attempt at staining a checkerboard pattern. I've installed the two pieces of stained basswood that act as the baseboard on both floors' walls. The fireplace and bookcase are put in just to dream!!!

 ___________________________ 

Puttzin' and Thinkin': Checking Scale and Ideas


Testing the placement of the components for the bay window.
Testing the scale of the bay window components with the 3/4 scale furniture pieces.


Well, I've made some good headway but soooo much more to go. But I'm very happy how the wee Tudor has come together so far.  Hope to see you soon for the next part of this ongoing odyssey!

Mock up and scale test of house 3/4 scale furniture and the possible stair placement.

Sunday, November 10, 2013

Retrofit the Kit Tudor Dollhouse: Part 3 It Arrives - Real Good Toys Country Tudor CC15

It has arrived!

A present arrived in the mail in a large box, from myself. Gee, I hope I will be happy!


So now there are no excuses, as in doing and inventory...

Using painter's tape to label the parts listed in the instructions.
Oh my! A lot of parts but labeling gave me a good sense of control! All the little like parts are bagged together, so I just labeled and kept them in their bags.

I learned the door was missing, but that worked out well. I contacted Real Good Toys© by email and they more than promptly sent one out. Now that's service!! They did appreciate I had done inventory. Let that be a lesson to us all!

You can see the instructions with their inventory list at http://cdn.shopify.com/s/files/1/0164/0860/files/CC15.pdf.


Testing the floors, their changes and measurements...

I've already decided I'm lowering the ceiling of the 2nd floor. Even at full scale (1:1), it will still be believable and 1" scale furniture will fit. So I draw preliminary lines that I'm sure will change as I continue the process!


Testing the plan for a bay window...

These will be the pieces for the bay window, two Concord room dividers (in different colors) for windows and a disassembled thimble display that will act as a bookcase between them. The bay will jet out from the outside wall about an inch. I'll have to strip the finishes and try to stain them all the same color.


Disappointment: Two different plywood wood types and ...

Since I have limited fabric to use as wallpaper, I was hoping to emulate wainscotting using the kit's wood veneer inside surfaces of the sides, front and back. Unfortunately, the inside front and side panels have different veneers and the back is masonite. Oh well, now I have plan on buying something to create the uniform wainscotting I'm looking for.
Left: front inside panel stained. Center: side inside panel stained. Right: masonite and peak backs.


INSTRUCTIONS ALTERATION:

The last panel is the new back, now one piece instead of two.
Straying from the directions and parts components, I bought a half sheet of 1/4" aspen plywood that my husband cut a new back panel from. It incorporates the kit's 3/8" plywood peak back and it's back 1/4" masonite panel. Since I'm lowering the 2nd floor ceiling, the kit's back peak will come up short anyway. Keep your fingers crossed it will all work out!

I've taped off the areas the new wainscot panels will go and painted the remaining areas an off-white satin finish. I'm toying with removable wallpaper panels.


...waiting (again!)

So, after much calculation and price configurations, I've ordered 4 sets of precut paneling with chair rail from my favorite dollhouse supply vendor, Manchester Woodworks at http://manchesterdollhouseandwoodworks.com/. Good prices, quick, combined shipping and great communication. Very dependable too.

A #WC1/4 set description from Manchester Woodworks:
  • Seven pieces wainscot panels and one chair rail per order.
  • Each panel measures 1/16"t x 3-1/2"w x 2-7/8" h. (2mm x 88mm x 73mm).
  • Chair rail measures 1/8 x 1/4 x 24" (3mm x 6mm x 609mm).
  • 7 panels end to end equal 24-1/2" in length.
  • Made of unfinished basswood.

That gives me 28 pieces of precut paneling and 4 pieces of chair rail. Plus I ordered some lovely "Lace Weave" molding (CLA78173), I'm going to use for crown on the 1st floor ceiling.

Retrofitting thoughts:

1) Move the stairs from the 1st floor to the 2nd. More space on the first floor.
2) Some sort of treatment of the floors (even though I have planned paper tile for the 1st (it is removable anyway)).
3) The attic space will be an art studio (oh boy! What am I thinking??).

Oh! I can hardly wait, again!! Get here soon wainscoting and trim!

Tuesday, November 5, 2013

Retrofit the Kit Tudor Dollhouse: Part 2 Create While You Wait - Real Good Toys Country Tudor CC15

It's hard to wait. So I dream and work on little projects I hope will work in the house. I've retrofitted a kitchen fireplace and a living room fireplace to pass the time and played with floor ideas using my computer...


___________________________


Kitchen Fireplace


I bought an a little fireplace off eBay, but it was just not tall enough to be at all believable in a 1:1 scale dollhouse. Using my hubby's paint stripper heat gun (my newest favorite tool!), I took it apart by melting it's glue. Then I flipped the hearth and the mantle and cut the back in half to make larger sides out of, glued it back together and voila! The chimney wasn't thick enough so I added some scraps on it's side and added some brick paper for the back of the fireplace.

___________________________


Living Room Fireplace


The center pict shows the comparison of the old and new mantles and hearths.

I started out with a little 1:1 scale fireplace called the James Town by Houseworks. The mantle and the floor were a bit too fancy and large so, once again, I used the heat gun to melt glue and take them off. I made the surround bone white to try and emulate stone and used shoe polish to smoke up the inside.


___________________________


"Tile" Floor


___________________________


Retrofitting thoughts:

1)  Make the 2nd floor shorter to have more useable space in the attic.

2) Blow out the 2nd floor windows and create a bay window.

3) Brick paper the outside 1st floor.

4) Find or make a dutch door for the entrance.


Hmmmm....Hurry up and get here kit!


Friday, November 1, 2013

Retrofit the Kit Tudor Dollhouse: Part 1 The Waiting - Real Good Toys© Country Tudor CC15

In the beginning....

I can't remember what came first, the half yard of cute medieval fabric or the 3/4 scale Barton Tudor furniture, 


but I realized I had a hankerin' to put the two together in a dollhouse and experiment with the Tudor style.


Eventually, after much research and cost considerations, I decided on the pre-fab kit, the Real Good Toys' Country Tudor CC15 (I'm still too chicken to start a dollhouse from scratch!). It's 1:12 scale, so I hope I can make it span between the three quarter scale and one to one scale worlds. You can find it at http://www.realgoodtoys.com/products/country-tudor-dollhouse-kit, though I bought mine through Wayfair.com.


Real Good Toy's Country Tudor CC15.

It has that front opening wall feature which keeps the dust out and eliminates the question, "What side of the dollhouse should I display?". It has a small profile, 29"h x 14"w x 12 1/2"d, which fits well in my small home and with my fledgling dollhouse construction abilities!

_____________________ 


So whilst waiting for the wee kit to arrive....


I entertain myself with possible plans for retrofitting it, using some of the other cool Tudor type stuff I have accumulated.

Oh! I can hardly wait for it to arrive!

Monday, October 28, 2013

An Ugly Duckling UK Dolly Mixture

I bought this poor thing right after my lovely Dolly Mixture/Pennine arrived from the UK. A 1/2 to 3/4 scale, homemade, two room dollhouse, it's kind of a little shack, but there was something very endearing about it. It has the Romside windows and door, however beat up, and a large chimney, which serves as a battery holder for the one light that used to light up!

 ______________________


Welcome little Ugly Duckling. We'll take care of you! 

After all, you're just a little thing at 17" l x 9" w x 6.5" h (9.5" with chimney).

Torn paper brick and roof tiles and a bit of grime.

Battery pack chimney and on and off switch. Very primitive!

______________________


Insides


The two quaint little rooms and their opening wall front.

Two little names, Akinos and Alma, one on each room's wallpaper. Hence the AA on the battery chimney.

______________________


A Gentle Face-Lift 


Well, never leaving well enough alone, I set out to remodel the little shack a bit, hoping to keep it's rather charming, unpretentious feeling!

 
  I polyurethaned the whole outside, hoping to preserve it's "used" patina, and made flower boxes and a porch roof, just to give it a little extra welcome.

______________________


Insides

 
I made a fireplace wall for it out of an old beat up Strombecker fireplace, scrap booking paper and a cheap compact mirror. I like to think it looks a little shabby deco!

______________________


Living Room 


Here's the fireplace wall, "installed" with it's matching Strombecker radio and a cute little rattan etargere. The ceiling and the floor have been treated with scrap booking paper, of course!

 More beat up Strombecker furniture with it's simple lines, yet quite stylish in this little abode. That's me, as a scottie dog. I've always wanted to be one since I was four!

______________________

  Kitchen


This room seemed a natural as a kitchen. The little shelf was already installed by it's previous owners.


Scrap booking paper on the ceiling and floor.


Another case of shabby Strombecker and Kage furniture. I committed the cardinal sin, I painted the stove red (it was green) and added the little splash on the back of it. The little sink and table were already painted.


Kage chairs and a scottie's eye view!


______________________


Well, hopefully this little rag tag family is happy in their rag-tag home. It's and odd one, but I think very sweet.


Monday, October 21, 2013

Schafer Chalet Dollhouse: Dolly's Up North Vacation Home


Dolly's remodeled summer "cottage", right off Lake Michigan, of course!

  _____________________________


Big Distraction

I bought this chalet from a lovely young mom who was selling her childhood items to help pay for her son's alternative Autism treatments. It is a 1:12 scale, 34”w x 31”h x 14” d home that is on casters, which is good, as it is big and heavy. It was a big distraction as I was repainting my own master bedroom and this home made it very hard for me to stay focused on such a mundane task!!

Here it is before the outside remodel that Dolly commissioned...

and after...

Notice the fancy popsicle stick shutters. Ooooo, ahhhhhh!
 _____________________________


The Inside

Its a summer cottage so why bother changing the wallpaper? It’s all pretty nice anyway and I really wanted to keep some of the lovely original integrity of this huge home. 

This home teeters between full scale furniture (1inch = 1 foot) and 1:16 scale (3/4 scale) furniture. 
_____________________________


 Kitchen.... 

Strombecker kitchen appliance set, 3/4 scale, and a German dining set, 1:1.

_____________________________


Living Room...

Strombecker 1:1 and 3/4 scale furniture. The side tables are Kage.
Love the wood plank drawn on floor. Now Dolly's looking for the "just right" curtains.
_____________________________


Bedroom... 

1:1 scale German bed room set. I need to make some bed linens!!

I think the wallpaper is actually gift wrapping paper in the first and second floors of this home. Fragile, but effective.
_____________________________


Bathroom...

This a 1:1 scale German bathroom set, sold in the USA about 1966.
I debated taking this bathroom out, opening the back wall up into the hall that leads to the balcony. I just couldn't do it! I used a piece of linoleum to cover the stair cut out so the bathroom set would fit better. There weren't stairs that came with the home anyway.
 _____________________________


Hall...

Here’s the hall that goes between the two bedrooms and in back of the bathroom. Leads out to the balcony. Not very accessible but looks good!
 _____________________________


Library...

Nancy Forbes 3/4 scale cabinet and side table, and a Greek ashtray (unused!!) on the fireplace.
 I could’ve made this into another bedroom but I had a few pieces of vintage upholstered Japanese chairs I thought would make for comfortable reading.
_____________________________

Kid's Attic Bedroom...

1/2, 3/4 and 1:1 scale furniture.
Yes, even dolly children get relegated to the attic! Young dollies can navigate many stairs better than their elders.

...and Mom's Sewing Room


Well, for good or bad, this huge dolly home now has a home in our little home. Too bad it can't be made into a coffee table but it is still sweet and with wheels, easy to use. Its also a good size for little hands, if ever we have grandchildren! Ya! What's with that???

Tuesday, September 24, 2013

All the Way, From the UK! My Dolly Mixture

UPDATE!

It has been determined by Rebecca Green of Dolls Houses Past & Present that this little UK home is most likely a Pennine dolllhouse, made in the 1960's or 70's. The little side railings give it away. Yay!


 A half scale, vintage English dollhouse, with an opening front and working windows.


All the way from the UK

The wee Dolly Mixture came to play

Smelling of must and needing a dust

This Dolly Mixture is almost upper crust!

Romside metal windows, all function with their little latches.


At first I thought it was a vintage GeeBee home (no, not the Bee Gees 70's singing group) but my lovely internet dollhouse friends at www.dollshousespastandpresent.com have me convinced it is a Dolly Mixture. I understand this term refers to a dolls house that was purchased as a kit or ready made, but not by the famous English makers like Tri-ang, Amersham or GeeBee. Hmmm.
____________________


Roof

With just a few and far between chips

This groovy roof is so hip

A chimney each side is does so muster

To fight the cold when the wind 'ablusters!


Unfortunately, its attic space is inaccessible.  Oh well!
____________________


Inside

Open the front, there's really not much

Two rooms oh so plain, and a hidden domain

Nails protrude from the roof, a dangerous goof?

Don't jump on the bed Dolly, you'll open your head!


It had flaking, gray, over scale wallpaper that came off readily with a gentle tug, built in lights with switches that don't work, yet, and giant nails to attach the roof. Ouch! 
____________________


Bedroom

Yellow, its said, is good for the bed

And nails that are now covered so you don't hurt your head

A wee little stove to keep out the cold

And on ensuite bath to blow one's nose.


Dol-Toi armoire, English gas stove, Tootsie Toy (1930s) side table and Kiddies Treasure (1953) furniture set.

Bath

A difficult little alcove to outfit and shoot. Tootsie Toy (1930s) bath set.

____________________

Living Room

Welcome to our humble abode

Sit on the couch, take off a load

Kitchen is what we have for naught

Lots of takeout that's what we got!

Kage fireplace (1940s), Petite Princess (1970s) tea cart, Dol-Toi furniture. Chandelier made by me!
 ____________________ 

 Porch

Dolly doesn't have an auto

Lets pretend she's won the lotto

And get a fountain for her grotto

Sit in the shade where it isn't so hotto.


____________________  

So now its time to say goodbye

Dolly mixture on the state side

Hope too lonely you won't be

You have new friends, Dolly and me!