Pages

Showing posts with label Floor. Show all posts

Thursday, December 19, 2013

Retrofit the Kit Tudor Dollhouse: Part 7 Stairway To Heaven (NOT, Just the Art Studio) - Real Good Toys Country Tudor CC15

Oye!!!!!! Once I finally made the "jump" to attach the stairs, it went pretty fast! With Thanksgiving and getting my wisdom teeth pulled, it just got put off. Dolly's gonna be living in an igloo at this rate!


Gettin' Ready


Figured I'd better set the back up to get just the right position for the stairs:


Earlier I centered and applied the wallpaper on the 2nd floor back. After taping the back securely on, I glued the stairs to the back, not the landing or ceiling. I still want to be able to take the back off for when I work on the inside front. Having thru and thru access has proved to be a smart idea.


 __________________________


Pulling the back off, I'm able to apply the paneling and chair rail to the back wall:

Left pic: Why even clamping is so important!!!!                   Right pic: Morticia Adams lent me Thing for hand "clamping".


Since I don't have an unobstructed back wall anymore (the stairs), I get a glass of wine and set to "clamping" each paneling piece by hand, until they they are firmly set, about 15 minutes each. OK, so I had more than one glass of wine!!! I then fitted and cut the chair rail and glued it on.


 __________________________


Attic Art Studio


Well, I've been bad girl. I went to the local home improvement store and sampled some of the laminate flooring samples, about four matching ones of each kind that I was interested in "installing in my home". And the attic's side walls of this Tudor seem perfect for the sandwashed look of "Alpine Elm". Luckily I could get two sections out of each sample! They're easy to cut with a utility knife and straight edge, though you have to score them a few times.


I had enough chair rail left to use on the raw top edges of the attic's side walls. I glued and clamped them in first, then glued and clamped my "flooring" panels on, snugging them up into the chair rail bottom.


__________________________

Well, it can't be helped, I had to test the furniture pieces for the Attic Art Studio!!

Now I'm really glad I dropped the floor about an 1 1/2 ". This is fast becoming my favorite floor in the house (I say that about each of the floors I'm sure!).


Oh gosh! I can hardly wait, once again, to be done!!!

Friday, November 15, 2013

Retrofit the Kit Tudor Dollhouse: Part 4 Gettin' Down To Bizness - Real Good Toys Country Tudor CC15

Yay!

The panels and trim from Manchester Woodworks http://manchesterdollhouseandwoodworks.com/, have arrived, and I've sanded, applied two different stain colors and polyed the whole lot!


1st stain coat: Minwax Provincial. 2nd stain coat: Dark Walnut. I always start with the lightest stain first.
 ___________________________


The Floors

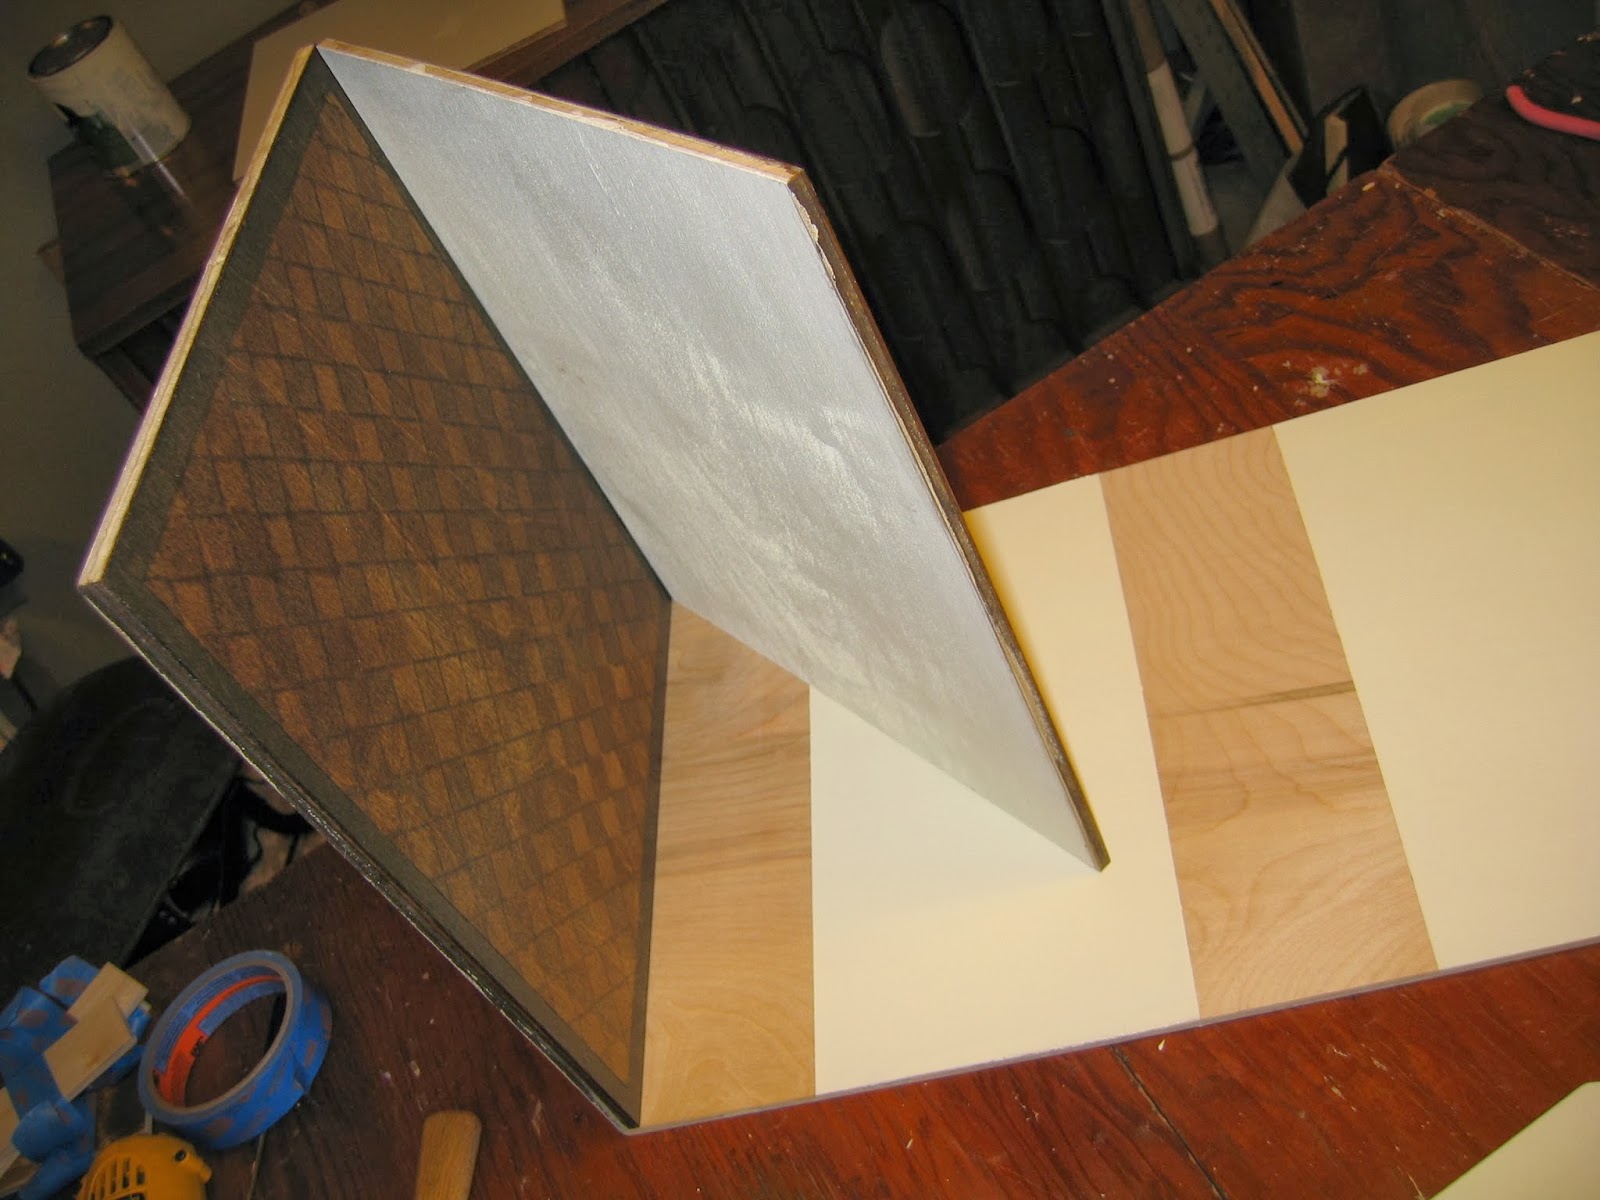
I've decided try some staining experimentation on the wood floors since I'm planning to cover them anyway. I wanted a checkerboard on the diagonal pattern. Creating the checkerboard pattern is trickier than it looks!

The first time I tried it I didn't score lines. It didn't work very well but it still had a nice, subtle effect. That experiment is now the 2nd floor floor (am I saying that right?).

Here is the technique that worked best for a lovely, stained, checkerboard floor:

              Step 1  Scoring the lines.                                                 Step 2 Taping alternate lines of squares.

Step 1: Scoring the lines (I used painter's tape to evenly space my lines. The width of the tape is the width of a square). You'll have to figure out your first diagonal so you'll have squares or elongated diamonds. Don't draw lines, let the width of tape be your guide and start with a tape spanning each end of your first and only diagonal markings.

  1. Lay out the tape on your first diagonal on your prestained board.
  2. Lay the metal straightedge just a smidgen past the tape edge. Hold down tightly!
  3. Using the back edge of a butter knife, press to score a line between the straightedge and the tape. (I have taped off a border). Score a couple of times to insure a good indentation.
  4. Lift the tape and place it up against the "fresh" score line. Continue scoring until all the "warp" scores are made.
  5. Perform the same scoring technique for the "weft" lines. They will be 180° to your previous lines.
Step 2: Staining the squares (3 stains total for this (you could use 2 - the initial board prestained, the 1st set of squares' stain and the 2nd set of squares' stain). I used pine for the prestain, provincial for the 2nd stain and dark walnut for the 3rd.
  1. Every other line of squares, tape off between the scores. Do this for both the warp and weft of the lines of squares so that there is a crisscross of tape with little open squares in between.
  2. Stain this first set of squares with your second color. Blot the stain on, gently.
  3. Remove the tape.
  4. Tape over these stained lines of squares, both the warp and weft, betwen the lines' scores. Only our prestain background color should be seen (with a bit of bleed over of course!).
  5. Stain this second set of squares with your third color (or if you want the squares to be all the same color, the same stain as your first set). Blot gently.
  6. Remove the tape and voila! Let dry and polyurethane the whole board (you can use waterbased poly).

Step 2 con't. The first stained squares.                                                                 Step 3 Finished!                   
 ___________________________ 

Beginning To Assemble: The 1st and 2nd Floors

(finally!) 

I've read all the instructions and have decided to assemble only the 1st and 2nd floors to the sides at this point. The instructions are pretty clever for this part, they have you use other parts of the home to support and get correct heights and such. I'm leaving the back off for now as I want good access to the interior sides when I apply the wainscot paneling.

Here, one side of the house has been glued and nailed to the 1st floor and sits flat on the table. Another floor is propped up at an angle to support the opposite side's attachment to the 1st floor.


In this photo two of the hinge blocks are taped and used as spacers to get the 9" ceiling height for the 2nd floor. I'm using the square to make sure the floor is square to the side before I glue and nail the other side onto the two floors.


I don't think I'll be covering the floors. I really like them stained!
And goody(!) a look at the sides installed with the front propped up behind. The 2nd floor floor shows my first attempt at staining a checkerboard pattern. I've installed the two pieces of stained basswood that act as the baseboard on both floors' walls. The fireplace and bookcase are put in just to dream!!!

 ___________________________ 

Puttzin' and Thinkin': Checking Scale and Ideas


Testing the placement of the components for the bay window.
Testing the scale of the bay window components with the 3/4 scale furniture pieces.


Well, I've made some good headway but soooo much more to go. But I'm very happy how the wee Tudor has come together so far.  Hope to see you soon for the next part of this ongoing odyssey!

Mock up and scale test of house 3/4 scale furniture and the possible stair placement.

Sunday, November 10, 2013

Retrofit the Kit Tudor Dollhouse: Part 3 It Arrives - Real Good Toys Country Tudor CC15

It has arrived!

A present arrived in the mail in a large box, from myself. Gee, I hope I will be happy!


So now there are no excuses, as in doing and inventory...

Using painter's tape to label the parts listed in the instructions.
Oh my! A lot of parts but labeling gave me a good sense of control! All the little like parts are bagged together, so I just labeled and kept them in their bags.

I learned the door was missing, but that worked out well. I contacted Real Good Toys© by email and they more than promptly sent one out. Now that's service!! They did appreciate I had done inventory. Let that be a lesson to us all!

You can see the instructions with their inventory list at http://cdn.shopify.com/s/files/1/0164/0860/files/CC15.pdf.


Testing the floors, their changes and measurements...

I've already decided I'm lowering the ceiling of the 2nd floor. Even at full scale (1:1), it will still be believable and 1" scale furniture will fit. So I draw preliminary lines that I'm sure will change as I continue the process!


Testing the plan for a bay window...

These will be the pieces for the bay window, two Concord room dividers (in different colors) for windows and a disassembled thimble display that will act as a bookcase between them. The bay will jet out from the outside wall about an inch. I'll have to strip the finishes and try to stain them all the same color.


Disappointment: Two different plywood wood types and ...

Since I have limited fabric to use as wallpaper, I was hoping to emulate wainscotting using the kit's wood veneer inside surfaces of the sides, front and back. Unfortunately, the inside front and side panels have different veneers and the back is masonite. Oh well, now I have plan on buying something to create the uniform wainscotting I'm looking for.
Left: front inside panel stained. Center: side inside panel stained. Right: masonite and peak backs.


INSTRUCTIONS ALTERATION:

The last panel is the new back, now one piece instead of two.
Straying from the directions and parts components, I bought a half sheet of 1/4" aspen plywood that my husband cut a new back panel from. It incorporates the kit's 3/8" plywood peak back and it's back 1/4" masonite panel. Since I'm lowering the 2nd floor ceiling, the kit's back peak will come up short anyway. Keep your fingers crossed it will all work out!

I've taped off the areas the new wainscot panels will go and painted the remaining areas an off-white satin finish. I'm toying with removable wallpaper panels.


...waiting (again!)

So, after much calculation and price configurations, I've ordered 4 sets of precut paneling with chair rail from my favorite dollhouse supply vendor, Manchester Woodworks at http://manchesterdollhouseandwoodworks.com/. Good prices, quick, combined shipping and great communication. Very dependable too.

A #WC1/4 set description from Manchester Woodworks:
  • Seven pieces wainscot panels and one chair rail per order.
  • Each panel measures 1/16"t x 3-1/2"w x 2-7/8" h. (2mm x 88mm x 73mm).
  • Chair rail measures 1/8 x 1/4 x 24" (3mm x 6mm x 609mm).
  • 7 panels end to end equal 24-1/2" in length.
  • Made of unfinished basswood.

That gives me 28 pieces of precut paneling and 4 pieces of chair rail. Plus I ordered some lovely "Lace Weave" molding (CLA78173), I'm going to use for crown on the 1st floor ceiling.

Retrofitting thoughts:

1) Move the stairs from the 1st floor to the 2nd. More space on the first floor.
2) Some sort of treatment of the floors (even though I have planned paper tile for the 1st (it is removable anyway)).
3) The attic space will be an art studio (oh boy! What am I thinking??).

Oh! I can hardly wait, again!! Get here soon wainscoting and trim!

Tuesday, November 5, 2013

Retrofit the Kit Tudor Dollhouse: Part 2 Create While You Wait - Real Good Toys Country Tudor CC15

It's hard to wait. So I dream and work on little projects I hope will work in the house. I've retrofitted a kitchen fireplace and a living room fireplace to pass the time and played with floor ideas using my computer...


___________________________


Kitchen Fireplace


I bought an a little fireplace off eBay, but it was just not tall enough to be at all believable in a 1:1 scale dollhouse. Using my hubby's paint stripper heat gun (my newest favorite tool!), I took it apart by melting it's glue. Then I flipped the hearth and the mantle and cut the back in half to make larger sides out of, glued it back together and voila! The chimney wasn't thick enough so I added some scraps on it's side and added some brick paper for the back of the fireplace.

___________________________


Living Room Fireplace


The center pict shows the comparison of the old and new mantles and hearths.

I started out with a little 1:1 scale fireplace called the James Town by Houseworks. The mantle and the floor were a bit too fancy and large so, once again, I used the heat gun to melt glue and take them off. I made the surround bone white to try and emulate stone and used shoe polish to smoke up the inside.


___________________________


"Tile" Floor


___________________________


Retrofitting thoughts:

1)  Make the 2nd floor shorter to have more useable space in the attic.

2) Blow out the 2nd floor windows and create a bay window.

3) Brick paper the outside 1st floor.

4) Find or make a dutch door for the entrance.


Hmmmm....Hurry up and get here kit!